November 23, 2009
Microsoft SharePoint Server 2010 Learning Snacks
- Developing Solutions with Microsoft SharePoint Server 2010 (20 minutes)
Microsoft SharePoint Server 2010 enables developers to build rich solutions easily, rapidly, and efficiently. This Learning Snack demonstrates how you can use Microsoft Visual Studio 2010 to create and deploy your solutions. It also demonstrates how you can build Microsoft Silverlight applications by using the SharePoint 2010 client object model, and how you can use LINQ to SharePoint to create SharePoint entities.
- Experiencing the Microsoft SharePoint Server 2010 User Interface (20 minutes)
Microsoft SharePoint Server 2010 includes an enhanced user interface that provides IT professionals with a streamlined administration experience. This Learning Snack describes the features of the SharePoint Server 2010 user interface. It demonstrates how the new Central Administration console enables you to perform several administrative tasks from one central location. The Learning Snack also describes how shared application architecture can be used for flexible deployments in SharePoint Server 2010.
- Managing and Troubleshooting with Microsoft SharePoint Server 2010 (17 minutes)
Microsoft SharePoint Server 2010 facilitates administration by providing several tools that help IT professionals efficiently manage data and troubleshoot any issues. This Learning Snack describes the Large List Resource Throttling feature, which helps you manage large lists. It demonstrates how a Microsoft SQL Server logging database can be used to log SharePoint events. The Learning Snack also demonstrates how the SharePoint Best Practices Analyzer can be used to detect and automatically fix common issues.
Link: here
October 23, 2009
How to fix the SharePoint Event 10016 error on Windows Server 2008 R2
1. Click Start, click Run, type dcomcnfg in the Open box, and then click OK.
2. Expand Component Services, expand Computers, expand My Computer, and then click DCOM Config.
3. Right-click IIS WAMREG admin Service, and then click Properties.
4. Click the Security tab.
5. Under Launch and Activation Permissions, click Edit.
6. In the Launch Permission dialog box, click Add.
7. In the Select Users, Computers, or Groups dialog box, type the domain user account that you specified as the Windows SharePoint Services 3.0 service account, click Check Names, and then click OK.
8. In the Permissions for UserName list, click to select the Allow check box that is next to Local Activation, and then click OK two times.
The problem with Windows Server 2008 R2 appears in the step 4 of the procedure. All under the Security tab is greyed/disable. It's due to permission restrictions.
To fix the problem and enable all under the Security tab, I invite you to switch to the Wictor Wilén blog to see the solution: http://www.wictorwilen.se/Post/Fix-the-SharePoint-DCOM-10016-error-on-Windows-Server-2008-R2.aspx
October 22, 2009
SharePoint Products and Technologies: 2010 (Technical Preview) Developer Documentation
Source: MSDN
Link: here
SharePoint 2010: SharePoint Developer Platform Wall Poster
Source: MSDN
Link: here
SharePoint 2010: Getting Started with Development on SharePoint 2010 Hands-on Labs in C# and Visual Basic
Use these 10 hands-on lab manuals for SharePoint 2010 to get started learning SharePoint 2010 development. Each lab is available in C# and Visual Basic. HOL01 - Developing a Visual Web Part in Visual Studio 2010This hands-on lab introduces the Visual Studio 2010 SharePoint development environment. It shows how to build a Visual Web Part using LINQ to SharePoint, and how to connect one Web Part to another Web Part on the page. HOL02 - Developing a List Definition and Event Receiver in Visual Studio 2010 This hands-on lab walks you through building a list definition for SharePoint 2010 in Visual Studio 2010. It also shows how to build an event receiver for the list in Visual Studio 2010 and deploy it to SharePoint. After the list and event receiver are deployed, you can use the developer dashboard to evaluate the performance of the event receiver. HOL03 - Developing Advanced Web Parts for SharePoint 2010 with Visual Studio 2010 This hands-on lab shows how to build a Web Part using several SharePoint-specific controls in Visual Studio 2010. Investigate advanced built-in Web Parts, including the Data View Web Part. HOL04 - Developing with LINQ to SharePoint in Visual Studio 2010 This hands-on lab explores a variety of LINQ queries on SharePoint 2010, going into more depth than the introductory hands-on lab. It also walks you through an exercise of creating a custom content type in Visual Studio 2010. HOL05 - Developing for SharePoint 2010 with the Client OM and REST in Visual Studio 2010 This hands-on lab introduces the Client object model for use in calling SharePoint 2010 APIs from a client machine. It also shows the use of ADO.NET Data Services to call REST services in SharePoint 2010. HOL06 - Developing a BCS External Content Type with Visual Studio 2010 This hands-on lab walks you through building an external content type for Business Connectivity Services using Visual Studio 2010. It also builds a form for Microsoft Outlook and shows the data being edited offline in Outlook. HOL07 - Developing a SharePoint 2010 Workflow with Initiation Form in Visual Studio 2010 This hands-on lab walks you through building a workflow in Visual Studio 2010 for SharePoint 2010. You add an initiation form to the workflow and use an external data exchange activity in the workflow. HOL08 - Developing SharePoint 2010 User Interface with Silverlight in Visual Studio 2010This hands-on lab walks you through building Microsoft Silverlight applications for use in SharePoint 2010. You will access SharePoint 2010 data in Silverlight using the Client object model. HOL09 - Developing SharePoint 2010 Sandboxed Solutions in Visual Studio 2010 This hands-on lab walks you through building a Sandboxed Solution Web Part for SharePoint 2010. It will also add code to the Web Part that overloads the limits placed by the sandboxed solution, and you will review how the solution is shut down. HOL10 - Developing SharePoint 2010 User Interface Ribbon and Dialog CustomizationsThis hands-on lab walks you through adding a custom action to the SharePoint 2010 ribbon, and creating a Web Part that uses the Dialog Framework.
Source: MSDN
Link: here
SharePoint 2010 (Beta) Developer Center
In addition, two interesting white papers are avalaible:
- SharePoint 2010: Professional Developer Evaluation Guide and Walkthroughs
- Evaluation guide for SharePoint Server 2010 (white paper)
October 05, 2009
EndUserSharPoint.com
In fact, this website deals with customization cases using mainly the out-of-box stuffs. It's a good knowledge base for SharePoint power users.
Link: here
September 14, 2009
SharePoint Team Announces the release of patterns and practices Developing SharePoint Applications guidance
"The Developing SharePoint Applications guidance helps architects and developers design and build applications that are both flexible and scaleable. It shows developers how to provide IT professionals with the information they need to maintain those applications and diagnose problems when they arise. The two reference implementations illustrate how to solve many of the common challenges developers encounter. One reference implementation addresses basic issues such as creating lists and content types. The other addresses more advanced problems such as how to integrate line of business services, how to create collaboration sites programmatically, and how to customize aspects of publishing and navigation. A library of reusable components helps you adopt techniques used in the reference implementations. The guidance discusses approaches for testing SharePoint applications, such as how to create unit tests, and documents experiences with stress and scale testing one of the reference implementations."
Link: here
Back to my blog after the holidays
Great reading to you,
Jay
July 16, 2009
AvePoint Introduces Free Tool for Item-Level SharePoint Restores from SQL Server and DPM Backups
July 03, 2009
Preconf 'SharePoint 2007 development with .NET Framework 3.5' track recorded at TechDays 2009 Belgium
Watch all the sessions here.
July 01, 2009
SharePoint Server Virtual Labs
See the labs list here.
June 30, 2009
Service Pack 2 Update
Read more: here
Webcast: "QuickStart with Ajax in Sharepoint" by Serge Luca
June 18, 2009
How to create create a new SharePoint site programmatically
To add a sub-site to site, we have to use the SPWeb.Webs.Add method which creates and returns a new SPWeb object. See this MSDN link for more information about the different parameters of the method: http://msdn.microsoft.com/en-us/library/ms473439.aspx
One time the site is created, we have to create the 3 default groups (Owners, Members and Visitors) and associate them with the new site. For that, we have to use a selfmade class called SPGroupsHelper which creates a group and its associations with the site.
Hereunder is a little console application showing a to create a site programmatically using unique permissions and based on the team site template:
using System;
using Microsoft.SharePoint;
using SiteCreation.Helpers;
namespace SiteCreation
{
class Program
{
static void Main(string[] args)
{
using (SPSite site = new SPSite("http://mysitecollectionurl/"))
{
using (SPWeb web = site.OpenWeb(site.RootWeb.ID))
{
try
{
web.AllowUnsafeUpdates = true;
string url = "TESTCREATION";
string title = "Test Creation";
string description = "This is a test site";
string type = "STS#0";
// Site creation with unique permissions
SPWebCollection webs = web.Webs;
SPWeb newWeb = webs.Add(url, title, description, 1033, type, true, false);
// Owners, members and visitors groups creation
SPGroup owners = SPGroupsHelper.AddGroup(newWeb, SPGroupsHelper.AssociatedGroupTypeEnum.Owners);
SPGroup members = SPGroupsHelper.AddGroup(newWeb, SPGroupsHelper.AssociatedGroupTypeEnum.Members);
SPGroup visitors = SPGroupsHelper.AddGroup(newWeb, SPGroupsHelper.AssociatedGroupTypeEnum.Visitors);
// Changing the request access email to current user
newWeb.RequestAccessEmail = newWeb.CurrentUser.Email;
// Save changes
newWeb.Update();
// Disposing new web object
newWeb.Dispose();
}
catch (Exception ex)
{
Console.WriteLine(ex.Message);
}
finally
{
web.AllowUnsafeUpdates = false;
}
}
}
Console.ReadLine();
}
}
}
Hereunder is the selfmade SPGroupsHelper classe used in the little console application:
using Microsoft.SharePoint;
namespace SiteCreation.Helpers
{
public static class SPGroupsHelper
{
public enum AssociatedGroupTypeEnum
{
Owners,
Members,
Visitors
};
public static SPGroup AddGroup(SPWeb web, AssociatedGroupTypeEnum associateGroupType)
{
switch (associateGroupType)
{
case AssociatedGroupTypeEnum.Owners:
return AddGroup(web, "{0} Owners", "Use this group to give people full control permissions to the SharePoint site: {0}", SPRoleType.Administrator, "{0} Owners");
case AssociatedGroupTypeEnum.Members:
return AddGroup(web, "{0} Members", "Use this group to give people contribute permissions to the SharePoint site: {0}", SPRoleType.Contributor,"{0} Owners");
case AssociatedGroupTypeEnum.Visitors:
return AddGroup(web, "{0} Vistors", "Use this group to give people read permissions to the SharePoint site: {0}", SPRoleType.Reader,"{0} Owners");
default:
return null;
}
}
public static SPGroup AddGroup(SPWeb web, string groupNameFormatString, string descriptionFormatString, SPRoleType roleType, string ownerNameFormatString)
{
web.SiteGroups.Add(string.Format(groupNameFormatString, web.Title), web.CurrentUser, web.CurrentUser, string.Format(descriptionFormatString, web.Name));
SPGroup group = web.SiteGroups[string.Format(groupNameFormatString,web.Title)];
try
{
SPGroup owner = web.SiteGroups[string.Format(ownerNameFormatString, web.Title)];
group.Owner = owner;
}
catch { }
if (descriptionFormatString.IndexOf("{0}") != -1)
{
SPListItem item = web.SiteUserInfoList.GetItemById(group.ID);
item["Notes"] = string.Format(descriptionFormatString, string.Format("<a href=\"{0}\">{1}</a>", web.Url, web.Name));
item.Update();
}
SPRoleAssignment roleAssignment = new SPRoleAssignment(group);
roleAssignment.RoleDefinitionBindings.Add(web.RoleDefinitions.GetByType(roleType));
web.RoleAssignments.Add(roleAssignment);
switch(roleType)
{
case SPRoleType.Administrator:
group.AllowMembersEditMembership = false;
group.OnlyAllowMembersViewMembership = true;
group.AllowRequestToJoinLeave = false;
group.AutoAcceptRequestToJoinLeave = false;
web.AssociatedOwnerGroup = group;
break;
case SPRoleType.Contributor:
group.AllowMembersEditMembership = false;
group.AllowRequestToJoinLeave = false;
group.AutoAcceptRequestToJoinLeave = false;
group.OnlyAllowMembersViewMembership = false;
web.AssociatedMemberGroup = group;
break;
case SPRoleType.Reader:
group.AllowMembersEditMembership = false;
group.OnlyAllowMembersViewMembership = true;
group.AllowRequestToJoinLeave = false;
group.AutoAcceptRequestToJoinLeave = false;
web.AssociatedVisitorGroup = group;
break;
}
group.Update();
web.Update();
return group;
}
}
}
Coach SharePoint on MSDN France
See your SharePoint coach here.
June 05, 2009
How to build a SharePoint view in grouping items by the first letter of the Title field
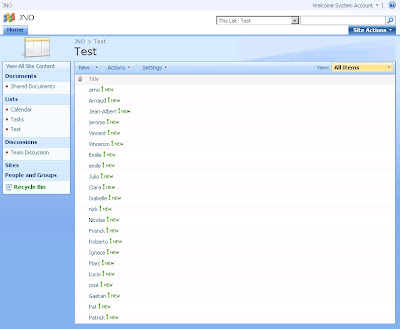
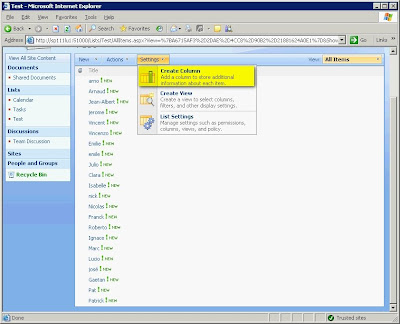
The first thing you have to do is to go in the Settings menu and to select Create Column.
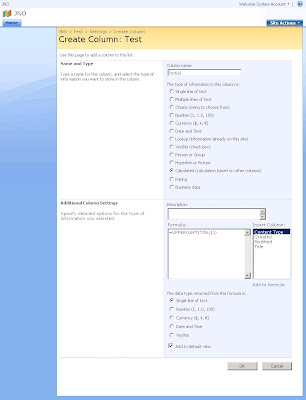
In the Create Column page, enter Initial as Column name and select Calculated as type of information.
As soon as you have selected Calculated, you will have the possibility to enter a formula. Enter =UPPER(LEFT(Title,1)) as Formula and select Single line of text as data type returned by the formula.
To complete this operation, click on OK.
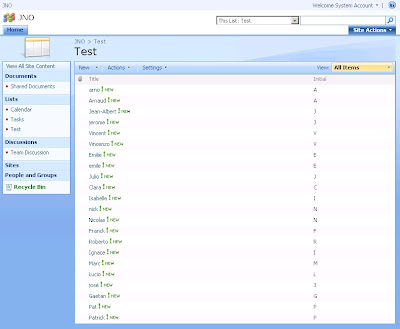
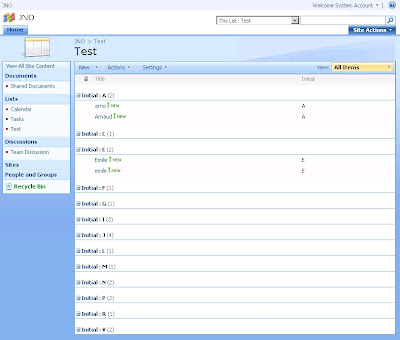
Then you will see on the view, the new column displaying the first letter of the Title field.
The next operation is to group the items by this new column. So, click on Modify this view in View dropdown list.

In the Edit View page, go to the Group By section and select Initial as First group by the column. Then click on OK to complete this operation.
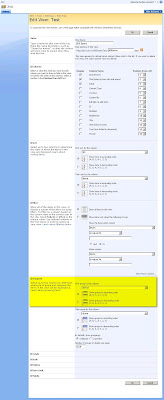
Now, you can see that the view displays the items group the items by the first letter of the Title field.
June 02, 2009
Bing: The new search provider from Microsoft!
Link: http://www.bing.com
May 29, 2009
SharePoint SDK 1.5 is released
Downloads:
- SharePoint Server 2007 SDK: here
- Windows SharePoint Services 3.0 SDK: here
MSDN Documentation::
- SharePoint Server 2007 SDK: here
- Windows SharePoint Services 3.0 SDK: here
Mark Wagner explains "How To Hide/Remove the View All Site Content link in SharePoint"
Here is the link to download the solution package: http://www.crsw.com/mark/Files/VASCSiteAction/VASCSiteAction-Binary.zip
May 28, 2009
Visual Studio 2010 and .NET Framework 4 Beta 1 available for download
Attention: Important Information on Service Pack 2
Read more: here
Content Types Inheritance: How to remove a field inherited from the parent in CAML
e.g.: 0x01 (ID of the Item Content Type) + 00 + 21D64BFAA43542c0B10CB673D6445495
The problem when inheriting is that you don't specially need all fields from the parent. To remove a field inherited from the parent, you have to use the RemoveFieldRef tag in specifying the ID of the field.
In the following example, I inherit from the Item Content Type but I add two new fields (Year and Amount) and I remove the Title field:
<?xml version="1.0" encoding="utf-8" ?>
<Elements xmlns="http://schemas.microsoft.com/sharepoint/">
<ContentType ID="0x010021D64BFAA43542c0B10CB673D6445495"
Name="Budget"
Description="Create a new budget"
Version="0"
Group="My Inherited Content Types" >
<FieldRefs>
<RemoveFieldRef ID="{fa564e0f-0c70-4ab9-b863-0177e6ddd247}"/>
<FieldRef DisplayName="Year" ID="{6FC684B4-CE06-480f-A8A5-E62277AAFB79}" Name="Year_MICT" />
<FieldRef DisplayName="Amount" ID="{A4D2A891-27D6-4f5d-B5C2-4A9AC4D2000D}" Name="Amount_MICT" />
</FieldRefs>
</ContentType>
</Elements>
Have a look on the following MSDN links to understand how Content Types work:
Base Content Type Hierarchy: http://msdn.microsoft.com/en-us/library/ms452896.aspx
Content Type IDs: http://msdn.microsoft.com/en-us/library/aa543822.aspx
Creating Content Types Based on Other Content Types: http://msdn.microsoft.com/en-us/library/ms460224.aspx<
May 06, 2009
White paper: Working with large lists in Office SharePoint Server 2007
Source: here
Download: http://go.microsoft.com/fwlink/?LinkId=95450&clcid=0x409
April 29, 2009
Service Pack 2 for Office SharePoint Server 2007 and Windows SharePoint Services 3.0 are available
Source: here
Service Pack 2 for Windows SharePoint Services 3.0, x86 & x64: http://www.microsoft.com/downloads/details.aspx?FamilyId=79BADA82-C13F-44C1-BDC1-D0447337051B&displaylang=en
Service Pack 2 for Office SharePoint Server 2007, x86 & x64: http://www.microsoft.com/downloads/details.aspx?FamilyId=B7816D90-5FC6-4347-89B0-A80DEB27A082&displaylang=en
April 16, 2009
Microsoft SharePoint “14” is now Microsoft SharePoint 2010
What happened to the Office piece of the name? We love MOSS. . . .
The first thing you’ll notice is that the MOSS acronym goes away with the new name since Office is no longer in the SharePoint official name. No one should worry that SharePoint doesn’t work great with Office 2010 since we removed Office from the name, just like people didn’t worry whether SharePoint was a great portal product when we removed Portal from the 2007 name.
The primary reason why we took Office out of the name - lots of folks associate the name Office with the Office client. We wanted to take the opportunity to reestablish the Office name and brand to be synonymous with the client suite. I say “Give the people what they Want” so everyone should immediately think of Microsoft Office = Office apps.
Don’t try to acronym Microsoft SharePoint Server to MSS since MSS is already taken by Microsoft Search Server. Just remember, SharePoint is SharePoint is SharePoint.
What about Windows SharePoint Services?
When you read through the announcement, you may be wondering what happened to Windows SharePoint Services. While we didn’t announcement anything new for WSS, and I want to assure you that we’re definitely working on a new v4 version of the product. It’s too early to drill into any of the details but WSS is getting a lot of new features and will be a great release. We’ll talk more about WSS at a later date.
So, what was announced?
Here are my key takeaways from the interview with Chris Capossela:
• Exchange 2010 will lead the way for the 2010 (previously referred by its codename “14”) wave of technologies and it will be available in the second half of 2009.
• Using Office Web applications, customers will be able to create, edit and collaborate on Office documents through a browser.
• IT professionals will be able to choose to either deploy and manage on-premises or hosted as a service.
• For developers, we are working on Open APIs, deep support for industry standards and developer tool support with Visual Studio 2010.
Thomas Rizzo
Sr. Director
SharePoint
Source: http://blogs.msdn.com/sharepoint/archive/2009/04/14/microsoft-sharepoint-14-is-now-microsoft-sharepoint-2010.aspx
April 15, 2009
How to create or copy permission levels programmatically
To modifies the permissions, you have to use the BasePermissions property (SPBasePermissions enumeration): http://msdn.microsoft.com/en-us/library/microsoft.sharepoint.sproledefinition.basepermissions.aspx
Hereunder is the Permission Levels page of a SharePoint site before:
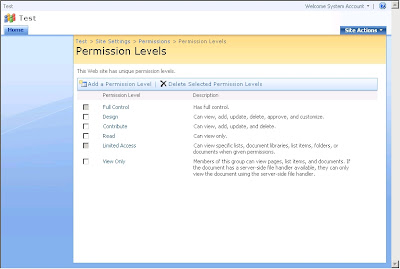
The following piece of code shows how to create a new permission level:
using (SPSite siteCollection = new SPSite("http://myserver:38000/sites/Test"))
{ using (SPWeb site = siteCollection.OpenWeb(siteCollection.RootWeb.ID)) { try { site.AllowUnsafeUpdates = true; // This code adds a new permission level SPRoleDefinition newRoleDefinitionTest = new SPRoleDefinition();newRoleDefinitionTest.BasePermissions = SPBasePermissions.ViewListItems | SPBasePermissions.OpenItems | SPBasePermissions.EditListItems | SPBasePermissions.AddListItems | SPBasePermissions.ViewVersions;
newRoleDefinitionTest.Name = "Test"; newRoleDefinitionTest.Description = "This is a permission level created for testing.";site.RoleDefinitions.Add(newRoleDefinitionTest);
site.Update();
}
catch(Exception ex)
{ Console.WriteLine(ex.Message);}
finally { site.AllowUnsafeUpdates = false;}
}
}
The following piece of code shows how to copy a permission level (in this case the permission level of the Reader role) and to add two new permissions to it:
using (SPSite siteCollection = new SPSite("http://myserver:38000/sites/Test"))
{ using (SPWeb site = siteCollection.OpenWeb(siteCollection.RootWeb.ID)) { try { site.AllowUnsafeUpdates = true; // This code copies the Read permission level (Reader role) and adds AddListItems and EditListItems permissionsSPRoleDefinition roleDefinitionRead = site.RoleDefinitions.GetByType(SPRoleType.Reader);
SPRoleDefinition newRoleDefinitionAdvancedRead = new SPRoleDefinition(roleDefinitionRead);newRoleDefinitionAdvancedRead.BasePermissions |= SPBasePermissions.AddListItems | SPBasePermissions.EditListItems;
newRoleDefinitionAdvancedRead.Name = "Advanced Read"; newRoleDefinitionAdvancedRead.Description = "This the Read permission level + AddListItems + EditListItems";site.RoleDefinitions.Add(newRoleDefinitionAdvancedRead);
site.Update();
}
catch(Exception ex)
{ Console.WriteLine(ex.Message);}
finally { site.AllowUnsafeUpdates = false;}
}
}
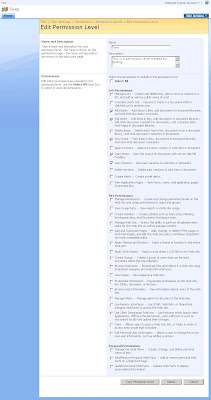
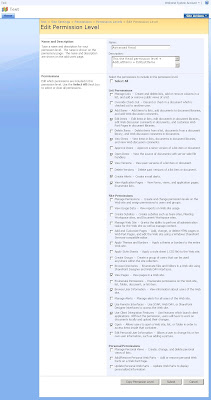
Hereunder are the Permission Levels page and the Edit Permission Level pages after:
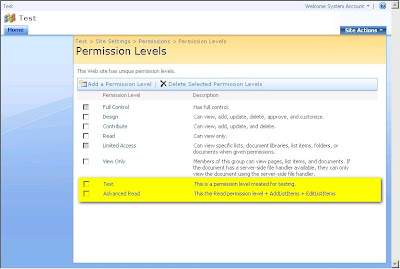
April 10, 2009
Planning worksheets for Office SharePoint Server 2007
April 07, 2009
Microsoft Office Interactive Developer Map
April 06, 2009
SharePoint Designer 2007 is now FREE
Download here
How to access the User Information List programmatically
using (SPSite mySiteCollection = new SPSite("http://myserver/myspsite"))
{using (SPWeb mySite = mySiteCollection.OpenWeb(mySiteCollection.RootWeb.ID))
{ SPList usersList = mySite.SiteUserInfoList;}
}
Note that there is another way to acces this list but I don't recommend it because it can throw an exception in a couple of situations:
using (SPSite mySiteCollection = new SPSite("http://myserver/myspsite"))
{using (SPWeb mySite = mySiteCollection.OpenWeb(mySiteCollection.RootWeb.ID))
{SPList usersList = mySite.Lists["User Information List"];
}
}
How to install Windows SharePoint Services 3.0 SP1 on Vista x64/x86
March 13, 2009
Remember Steve Ballmer's four words: I love this company!
I just wanna say five words: I love this company too!
March 12, 2009
How to access the hidden Workflow History lists
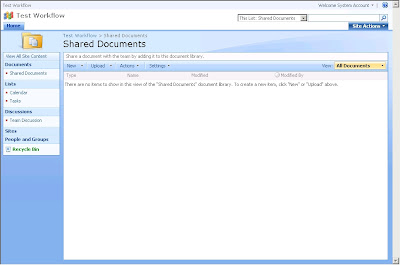
You have to click on Workflow Settings in the document library settings.
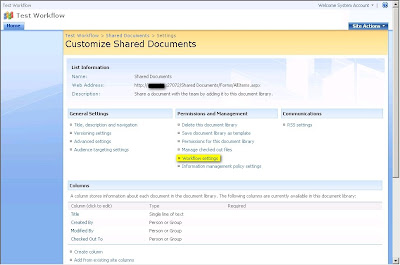
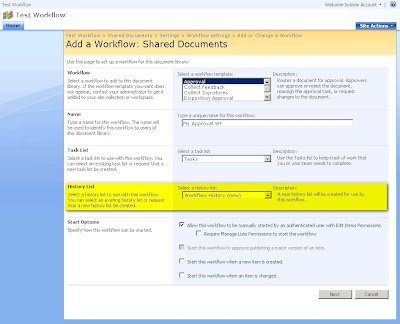
As there is no workflow defined for this document library, the Add a Workflow screen appears automatically. You can see that there is no history list defined. The dropdown list shows only Workflow History (new). To finish, you have to enter a name (e.g. My Approval WF) an click on Next.
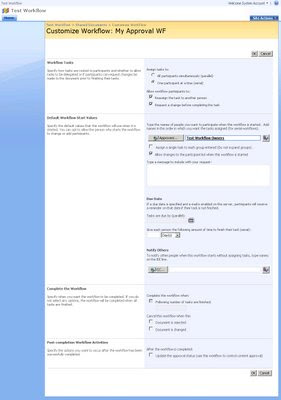
As it is an approval workflow, you have to set the approvers. In this example, you simply have to add the owners group of the site and click on Ok.
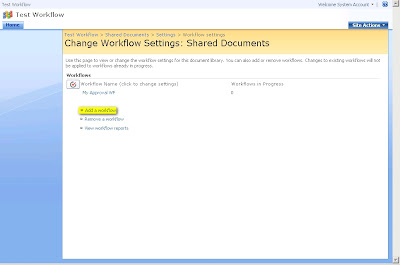
You will be redirected to the Change Workflow Settings screen. In this screen you have to click on Add a workflow. In fact, you have to create another workflow just to see that you can have more than one history list and to see how SharePoint generates the name for these lists.
So, the Add a workflow screen appears and you can see in there is an history list called Workflow History in the dropdown list. This list is the list by default which has been created in the same time than your first workflow.
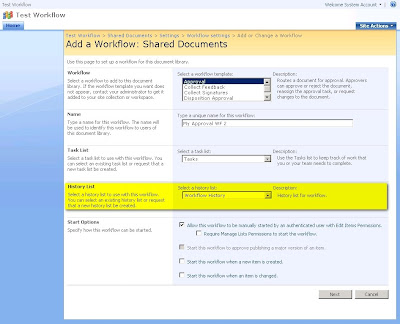
In the dropdown list, you have the possibility to create another history list in selecting New history list. Then, you have to enter a name (e.g. My Approval WF 2) and to click on Next.
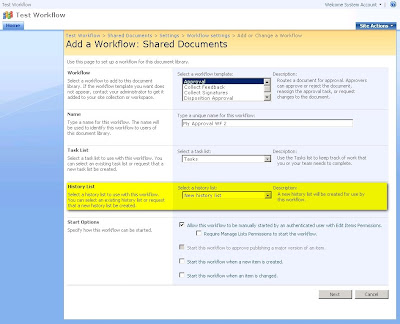
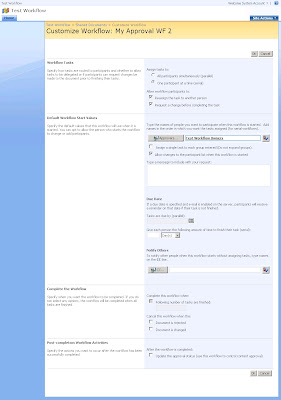
As previously done for the first workflow, you have to set the approvers and click on Ok.
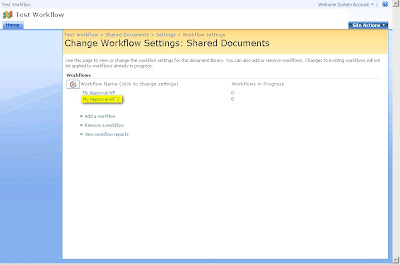
You will be redirected to the Change Workflow Setting screen. In this screen you have to click on My Approval WF 2.
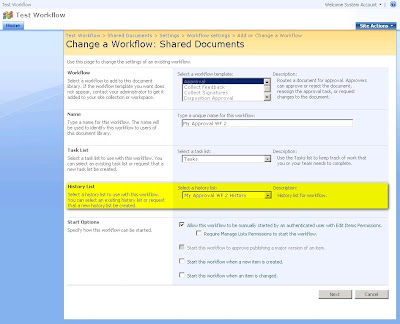
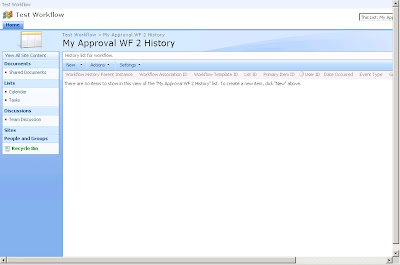
You will be redirected to the Change a workflow screen. You can see that a new history list called My Approval WH 2 History has been created. So, the name of the history list is a concatenation of the name of the workflow a space and History.
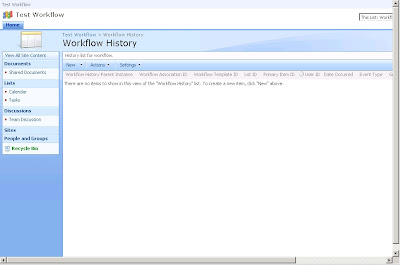
To access the history list of your first workflow, you have to add /Lists/Workflow History/ at the end of the url of your site.

And to access the history list of your second workflow, you have to add /Lists/My Approval WF 2 History/ at the end of the url of your site.

March 04, 2009
Alert Me: Someone changes an item that appears in the following view
February 26, 2009
How to add or remove appsettings key/value pair in the web.config of a SharePoint web application programmatically
I build a class (WebConfigManagement) containing static methods to help you to add or remove appsettings key/value pair:
using System;using System.Reflection;using Microsoft.SharePoint.Administration;namespace SharePointLiveForMe.SharePoint.Administration{/// <summary>
/// This class allows to add or remove entries in web.config.
/// </summary>
public class WebConfigManagement
{/// <summary>
/// This methods allows to add a key/value pair in the AppSettings section.
/// </summary>
/// <param name="Key">Name of the key</param>
/// <param name="Value">Value</param>
/// <param name="webApp">Web application</param>
public static void AddAppSettingsKeyValue(string key, string value, SPWebApplication webApp)
{if (!string.IsNullOrEmpty(key) && !string.IsNullOrEmpty(value) && webApp != null)
{SPWebConfigModification modification = GetModification(key, value);
if (!webApp.WebConfigModifications.Contains(modification)) {webApp.WebConfigModifications.Add(modification);
webApp.Farm.Services.GetValue<SPWebService>().ApplyWebConfigModifications();
webApp.Update();
}
}
elsethrow new ArgumentNullException();
}
/// <summary>
/// This methods allows to remove a key/value pair in the AppSettings section.
/// </summary>
/// <param name="key">Name of the key</param>
/// <param name="value">Value</param>
/// <param name="webApp">Web application</param>
public static void RemoveAppSettingsKeyValue(string key, string value, SPWebApplication webApp)
{if (!string.IsNullOrEmpty(key) && !string.IsNullOrEmpty(value) && webApp != null)
{SPWebConfigModification modification = GetModification(key, value);
if(webApp.WebConfigModifications.Contains(modification)) {webApp.WebConfigModifications.Remove(modification);
webApp.Farm.Services.GetValue<SPWebService>().ApplyWebConfigModifications();
webApp.Update();
}
}
elsethrow new ArgumentNullException();
}
/// <summary>
/// This method allows to build an SPWebConfigModification object.
/// </summary>
/// <param name="key">Name of the key</param>
/// <param name="value">Value</param>
/// <returns></returns>
private static SPWebConfigModification GetModification(string key, string value)
{if (!string.IsNullOrEmpty(key) && !string.IsNullOrEmpty(value))
{ SPWebConfigModification modification = new SPWebConfigModification();modification.Name = string.Format(@"add[@key=""{0}""]", key);
modification.Path = "configuration/appSettings";modification.Value = string.Format(@"<add key=""{0}"" value=""{1}"" />", key, value);
modification.Owner = Assembly.GetExecutingAssembly().FullName;modification.Sequence = 0;
modification.Type = SPWebConfigModification.SPWebConfigModificationType.EnsureChildNode;
return modification;}
elsethrow new ArgumentNullException();
}
}
}
Hereunder is a little console application to show how to use the WebConfigManagement class:
using System;using Microsoft.SharePoint.Administration;using SharePointLiveForMe.SharePoint.Administration;namespace Test.SharePointLiveForMe.SharePoint.Administration{ class Program {static void Main(string[] args)
{SPFarm farm = SPFarm.Local;
SPWebService service = farm.Services.GetValue<SPWebService>(""); SPWebApplication myWebApplication = null;foreach (SPWebApplication webApplication in service.WebApplications)
{if (webApplication.DisplayName == "My Web Application")
myWebApplication = webApplication;
}
Console.WriteLine("Write AppSettings Key/Value");
WebConfigManagement.AddAppSettingsKeyValue("IsCool", "true", myWebApplication);
Console.ReadLine();Console.WriteLine("Remove AppSettings Key/Value");
WebConfigManagement.RemoveAppSettingsKeyValue("IsCool", "true", myWebApplication);
Console.ReadLine();}
}


_504b.jpg)


