The Microsoft SharePoint Team has just published an update about the bug of Service Pack 2 concerning the expiration date.
Read more: here
June 30, 2009
Webcast: "QuickStart with Ajax in Sharepoint" by Serge Luca
Here is a link to an interesting webcast showing how to start with AJAX in SharePoint published by Serge Luca, a Belgian SharePoint MVP: http://sergeluca.spaces.live.com/blog/cns!E8A06D5F2F585013!5759.entry?wa=wsignin1.0&sa=353231701
June 18, 2009
How to create create a new SharePoint site programmatically
This article shows how to create a new SharePoint site programmatically. In this example, we will create a sub-site of the top level site (root) of a site collection.
To add a sub-site to site, we have to use the SPWeb.Webs.Add method which creates and returns a new SPWeb object. See this MSDN link for more information about the different parameters of the method: http://msdn.microsoft.com/en-us/library/ms473439.aspx
One time the site is created, we have to create the 3 default groups (Owners, Members and Visitors) and associate them with the new site. For that, we have to use a selfmade class called SPGroupsHelper which creates a group and its associations with the site.
Hereunder is a little console application showing a to create a site programmatically using unique permissions and based on the team site template:
Hereunder is the selfmade SPGroupsHelper classe used in the little console application:
To add a sub-site to site, we have to use the SPWeb.Webs.Add method which creates and returns a new SPWeb object. See this MSDN link for more information about the different parameters of the method: http://msdn.microsoft.com/en-us/library/ms473439.aspx
One time the site is created, we have to create the 3 default groups (Owners, Members and Visitors) and associate them with the new site. For that, we have to use a selfmade class called SPGroupsHelper which creates a group and its associations with the site.
Hereunder is a little console application showing a to create a site programmatically using unique permissions and based on the team site template:
using System;
using Microsoft.SharePoint;
using SiteCreation.Helpers;
namespace SiteCreation
{
class Program
{
static void Main(string[] args)
{
using (SPSite site = new SPSite("http://mysitecollectionurl/"))
{
using (SPWeb web = site.OpenWeb(site.RootWeb.ID))
{
try
{
web.AllowUnsafeUpdates = true;
string url = "TESTCREATION";
string title = "Test Creation";
string description = "This is a test site";
string type = "STS#0";
// Site creation with unique permissions
SPWebCollection webs = web.Webs;
SPWeb newWeb = webs.Add(url, title, description, 1033, type, true, false);
// Owners, members and visitors groups creation
SPGroup owners = SPGroupsHelper.AddGroup(newWeb, SPGroupsHelper.AssociatedGroupTypeEnum.Owners);
SPGroup members = SPGroupsHelper.AddGroup(newWeb, SPGroupsHelper.AssociatedGroupTypeEnum.Members);
SPGroup visitors = SPGroupsHelper.AddGroup(newWeb, SPGroupsHelper.AssociatedGroupTypeEnum.Visitors);
// Changing the request access email to current user
newWeb.RequestAccessEmail = newWeb.CurrentUser.Email;
// Save changes
newWeb.Update();
// Disposing new web object
newWeb.Dispose();
}
catch (Exception ex)
{
Console.WriteLine(ex.Message);
}
finally
{
web.AllowUnsafeUpdates = false;
}
}
}
Console.ReadLine();
}
}
}
Hereunder is the selfmade SPGroupsHelper classe used in the little console application:
using Microsoft.SharePoint;
namespace SiteCreation.Helpers
{
public static class SPGroupsHelper
{
public enum AssociatedGroupTypeEnum
{
Owners,
Members,
Visitors
};
public static SPGroup AddGroup(SPWeb web, AssociatedGroupTypeEnum associateGroupType)
{
switch (associateGroupType)
{
case AssociatedGroupTypeEnum.Owners:
return AddGroup(web, "{0} Owners", "Use this group to give people full control permissions to the SharePoint site: {0}", SPRoleType.Administrator, "{0} Owners");
case AssociatedGroupTypeEnum.Members:
return AddGroup(web, "{0} Members", "Use this group to give people contribute permissions to the SharePoint site: {0}", SPRoleType.Contributor,"{0} Owners");
case AssociatedGroupTypeEnum.Visitors:
return AddGroup(web, "{0} Vistors", "Use this group to give people read permissions to the SharePoint site: {0}", SPRoleType.Reader,"{0} Owners");
default:
return null;
}
}
public static SPGroup AddGroup(SPWeb web, string groupNameFormatString, string descriptionFormatString, SPRoleType roleType, string ownerNameFormatString)
{
web.SiteGroups.Add(string.Format(groupNameFormatString, web.Title), web.CurrentUser, web.CurrentUser, string.Format(descriptionFormatString, web.Name));
SPGroup group = web.SiteGroups[string.Format(groupNameFormatString,web.Title)];
try
{
SPGroup owner = web.SiteGroups[string.Format(ownerNameFormatString, web.Title)];
group.Owner = owner;
}
catch { }
if (descriptionFormatString.IndexOf("{0}") != -1)
{
SPListItem item = web.SiteUserInfoList.GetItemById(group.ID);
item["Notes"] = string.Format(descriptionFormatString, string.Format("<a href=\"{0}\">{1}</a>", web.Url, web.Name));
item.Update();
}
SPRoleAssignment roleAssignment = new SPRoleAssignment(group);
roleAssignment.RoleDefinitionBindings.Add(web.RoleDefinitions.GetByType(roleType));
web.RoleAssignments.Add(roleAssignment);
switch(roleType)
{
case SPRoleType.Administrator:
group.AllowMembersEditMembership = false;
group.OnlyAllowMembersViewMembership = true;
group.AllowRequestToJoinLeave = false;
group.AutoAcceptRequestToJoinLeave = false;
web.AssociatedOwnerGroup = group;
break;
case SPRoleType.Contributor:
group.AllowMembersEditMembership = false;
group.AllowRequestToJoinLeave = false;
group.AutoAcceptRequestToJoinLeave = false;
group.OnlyAllowMembersViewMembership = false;
web.AssociatedMemberGroup = group;
break;
case SPRoleType.Reader:
group.AllowMembersEditMembership = false;
group.OnlyAllowMembersViewMembership = true;
group.AllowRequestToJoinLeave = false;
group.AutoAcceptRequestToJoinLeave = false;
web.AssociatedVisitorGroup = group;
break;
}
group.Update();
web.Update();
return group;
}
}
}
Coach SharePoint on MSDN France
An interactive training is available for French-speaking people who want to begin with SharePoint development.
See your SharePoint coach here.
See your SharePoint coach here.
June 05, 2009
How to build a SharePoint view in grouping items by the first letter of the Title field
Let's imagine a SharePoint list where you want to group the items by the first letter of the Title field.

The first thing you have to do is to go in the Settings menu and to select Create Column.
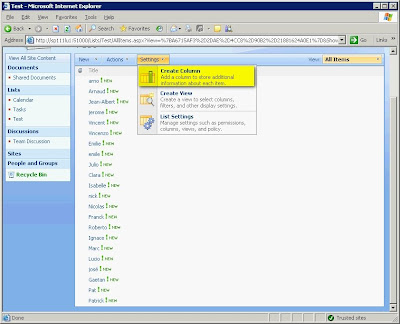
In the Create Column page, enter Initial as Column name and select Calculated as type of information.
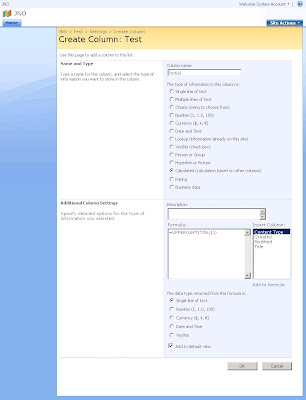
As soon as you have selected Calculated, you will have the possibility to enter a formula. Enter =UPPER(LEFT(Title,1)) as Formula and select Single line of text as data type returned by the formula.
To complete this operation, click on OK.
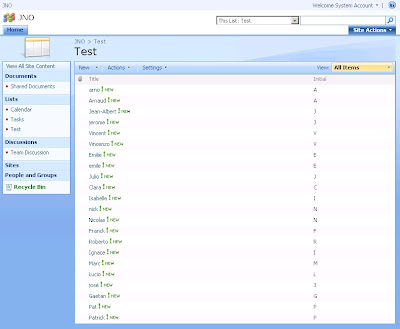
Then you will see on the view, the new column displaying the first letter of the Title field.
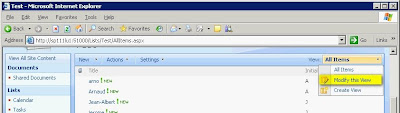
The next operation is to group the items by this new column. So, click on Modify this view in View dropdown list.
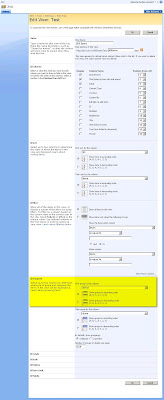
In the Edit View page, go to the Group By section and select Initial as First group by the column. Then click on OK to complete this operation.
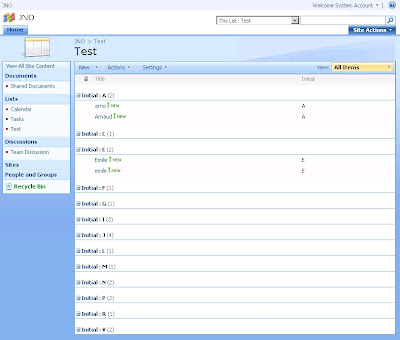
Now, you can see that the view displays the items group the items by the first letter of the Title field.

The first thing you have to do is to go in the Settings menu and to select Create Column.

In the Create Column page, enter Initial as Column name and select Calculated as type of information.
As soon as you have selected Calculated, you will have the possibility to enter a formula. Enter =UPPER(LEFT(Title,1)) as Formula and select Single line of text as data type returned by the formula.
To complete this operation, click on OK.

Then you will see on the view, the new column displaying the first letter of the Title field.

The next operation is to group the items by this new column. So, click on Modify this view in View dropdown list.

In the Edit View page, go to the Group By section and select Initial as First group by the column. Then click on OK to complete this operation.

Now, you can see that the view displays the items group the items by the first letter of the Title field.

June 02, 2009
Bing: The new search provider from Microsoft!
I invite you to test the new search provider from Microsoft. It seems to be very nice and a great alternative to Google.
Link: http://www.bing.com
Link: http://www.bing.com
Subscribe to:
Comments (Atom)


_504b.jpg)

